Knife Skills 101
August 2020

Whether you’re just starting to expand your culinary talents, or you’ve been getting along just fine without formal education in knife skills, the best meals start not only with the freshest ingredients, but the right knives. Not only does using the right knife, in the right way, ensure kitchen safety, but it also makes your cooking more efficient, and can even make the food taste better. Start here:
The Beginner’s Knife Kit
For a novice cook, start with just a chef knife and paring knife. You can get most small and large jobs done with these all-purpose knives. A bread knife is the next knife to invest in – trust me, if you put the effort in to making a loaf of bread or pastry you don’t want to ruin it by trying to cut it with a chef’s knife. A cleaver is great for cutting open big fruit or dense vegetables and you can pick one up for cheap since it isn’t used too often.
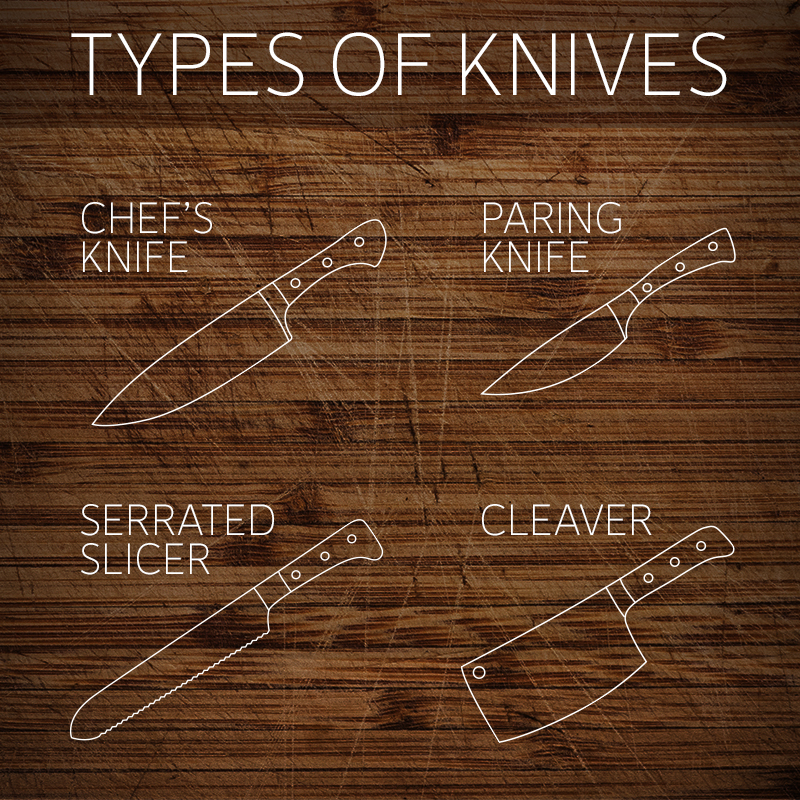
Basic Types of Knives:
Chef’s Knife
All-purpose knife usually 8 to 14 inches, wide at heel and tapers to a point at the tip. Used for chopping, slicing and mincing.
Paring Knife
All-purpose knife used for smaller jobs, usually 2 to 4 inches, used for more precise detailed work, peeling or cutting fruits and vegetables.
Cleaver
A heavy, large rectangular blade used for chopping or cutting through large items.
Serrated Slicer (bread knife)
A long, thin blade with a serrated edge, used for slicing bread or pastry.
Taking Care of your Knives and Knife Safety
Always:
- Keep your knife sharp! It’s easy to cut yourself with a dull knife since you need to apply more pressure, and it’s more unpredictable when cutting things like onions. If you do injure yourself with a sharp knife, the cut is cleaner and easier for a doctor to mend.
- Use your dominant hand when using your knife.
- Cut away from yourself.
- Use a cutting surface (plastic or wood is best)–do not cut on glass, marble, countertop, or metal as these surfaces will dull the knife.
- When walking with a knife, keep it parallel to you, point down and close to your thigh.
- Do not attempt to catch a falling knife. Just step back and allow it to fall.
- Never drop a knife in a sink of water. Hold onto your knife while you wash it.
- When wiping the blade, use a folded towel and have the cutting edge away from you.
- Store your knives safely–a knife block or wall-mounted magnetic strip is best.
- Always wash your knife by hand–a dishwasher may damage the knife.
Sharpening Your Knife
For novice cooks, it is best to get your knife professionally sharpened every 10,000 cuts (which usually works out to be about 6 months). This is usually less than $10 a knife. In-between professional knife sharpenings, you should hone your blade with a honing steel (sometimes called a sharpening steel) once every week or two. Using a honing steel does not actually sharpen your knife but straightens the blade– keeping your blade in better condition.
How to use a honing blade:
- Hold the steel in your non-dominate hand and the knife in your dominate hand.
- Place knife blade against the steel at a 20 degree angle.
- Draw the blade along the entire length of the steel from the heel of the blade to the tip.
- Repeat on each side several times. (10 times on each side is usually enough).
A good test to check the blades sharpness is to draw the blade against the skin of a tomato. Without any pressure the blade should pierce the skin.
Basic Knife Skills
- Choose the right knife. A small knife for a smaller job or a big knife for a bigger job. Use your chef’s knife for chopping, slicing, dicing and mincing, and your paring knife for peeling and doing detail-oriented work. When cutting bread, pastry or anything delicate and light use your serrated slicer. Butchering through large fruit and vegetables (cabbage, melon, etc.) reach for the cleaver. Cut your large produce in halves or quarters with your cleaver and then use your chef’s knife to finish them.
- Hold you knife firm, but not so tight that your hand will get tired. The most common grips are to hold the handle with 3 fingers while gripping the blade between your thumb and index finger or to hold the handle with 4 fingers and place your thumb on the front of the handle.
- Cut with smooth, even strokes. When using your knife, the blade should be doing the cutting not the force you put on the blade.
- Protect your fingers! Hold the food you’re cutting using a claw handgrip. Curl your fingertips back and hold the item between your thumb and fingertips. Use your knuckles as a guide for the knife and feed the food into your knife with your fingers.
Cutting methods
- For smaller foods: Keep the tip of knife on cutting board and lift the heel of the knife. Draw the heel of the knife downward with the tip of the knife still on the cutting board. Repeat.
- For larger foods: Lift the knife’s tip and slice by drawing the knife back and down through the item – this motion should be coming from the wrist.
- Slicing cuts an item into relatively broad, thin pieces. Slicing is used both for the finished product and also is used to produce other cuts.
- Chopping cuts an item into small pieces where size and shape uniformity does not matter.
- Mincing happens by quickly rocking the knife back and forth on your board across the food you are cutting. Use the mincing method to get food (especially fresh herbs) into very small cuts.
Dimensions of cuts
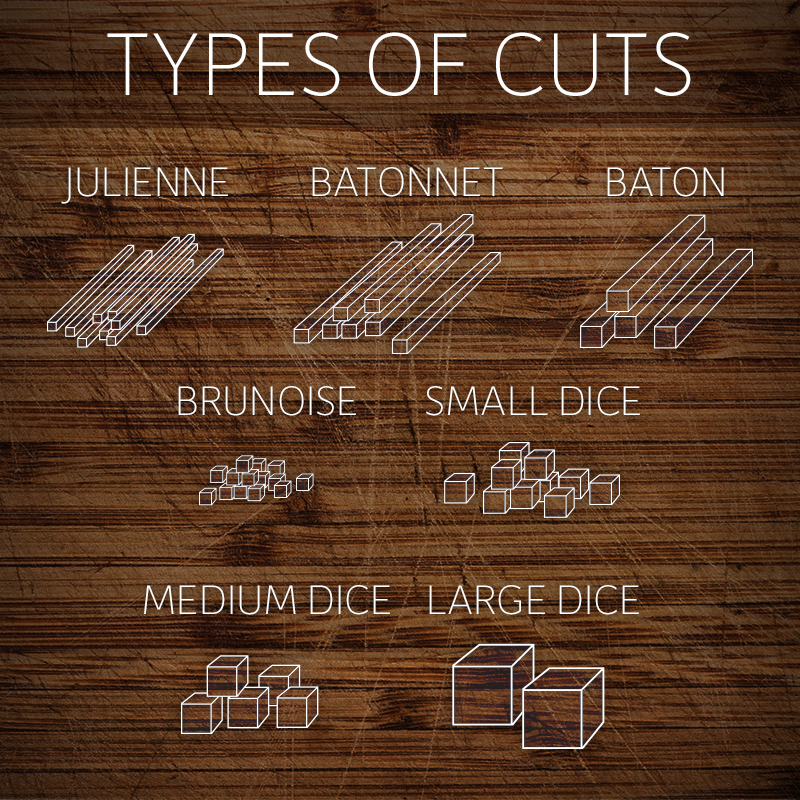
If a recipe calls for a julienne or brunoise cut, it is referring to a standard dimension.
Stick shapes
To cut into stick shapes, first cut a flat edge in to the vegetable. Place the flat end onto your cutting surface. Slice vegetable into desired width. Then cut each slice into desired stick size.
- Julienne (1 to 2 mm x 1 to 2 mm x 2.5 to 4 cm)
- Batonnet (6mm x 6mm x 65 to 6 cm)
- Baton (12mm x 12mm x 6 cm)
Cube shapes
To cut into cube shapes, you must first cut into stick shapes and then into cubes.
- Brunoise (1 to 2mm x 1 to 2mm x 1 to 2mm)
- Small Dice (3 mm x 3 mm x 3 mm)
- Medium Dice (6 mm x 6mm x 6mm)
- Large Dice (12mm x 12mm x 12mm)

Happy cooking!
Related Articles
-
 Read article
Eating for Cold Weather
Warming Foods and Spices The weather might leave you feeling cold and chilly, but there are...
-
 Read article
Top 12 Plant-Based Soups and Stews
These easy recipes for vegan soups and stews from all over the world will warm up...
-
 Read article
Top 10 Vegan Thanksgiving Recipe Ideas
Whether you’re planning out-hostessing Martha, or bringing a holy-cow-this-doesn’t-have-butter side dish, I’m sure your Thanksgiving and...


